Sunday, 19 April 2015

Microsoft Outlook - How to Leave A Copy Of Messages On the Server

If the option to Leave a copy of the message on the server is missing in Outlook 2010, it may be due to the type of email account you use. Of the most common types of email accounts, only POP3 accounts download the email to your computer.

If you have an IMAP, or HTTP (Gmail, Outlook.com etc.) account, mail is not generally stored on your computer. All email remains on the mail server until you delete it.

To enable (or disable) the Leave a copy of the message on the server option, follow these steps:
  1. Open Outlook.
  2. Click the File tab > Account settings.
  3. Highlight your current POP3 account and click Change.
    Note: The window that opens will tell you what type of email account you have. (Look under Type.)
  4. Choose More settings and click on Advanced.
  5. You should see a check box titled: Leave a copy of messages on the server.
  6. Checking the box will enable Leave a copy of the message on the server.
Note: Enabling Leave a copy of the message on the server will allow you to access your email from multiple computers.

If you would like to know more about different email account types, see Introduction to e-mail account types.

Thursday, 16 April 2015

Auto-complete - On or Off?

Microsoft Office Auto-Complete

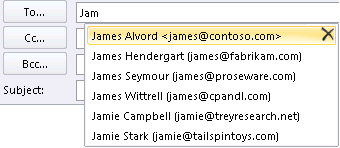
The Auto-Complete List is a Microsoft Outlook feature which brings up suggestions for names and e-mail addresses as you begin to type them. These suggestions are possible matches from a list of names and e-mail addresses derived from the e-mail messages that you have sent.

Auto-Complete list

By default, this feature is turned on in Outlook. To turn on or off Auto-Complete List name suggestions, do the following:
  1. Click the File tab.
  2. Click Options.
  3. Click Mail.
  4. Under Send messages, select or clear the Use Auto-Complete List to suggest names when typing in the To, Cc and Bcc lines check box.

Friday, 3 April 2015

Error: 0x8004102C error message hotmail 2010 exceeded its message limit and some items could not be synchronized

There is restriction set by Hotmail on number of messages sent on any given day. The daily messages limit is not only for Hotmail users but even applicable for other Internet Service providers (ISP) and E-mail Service providers (ESP). It is solely based on how the ISP and ESP have the restrictions set in order to block Spam e-mails and there is nothing we can do with the MAPI client.

You may refer to the following link on daily message limit for Hotmail/Windows Live users:
http://windows.microsoft.com/en-us/windows/outlook/errors-sending-mail

Any e-mails you send through Outlook will eventually goes through the respective Service provider and restrictions are set on the server whether to block the messages or limit the e-mails exceeding on a daily basis.

Wednesday, 1 April 2015

My Email Text is Too Small or Too Big

When you compose, reply to, or forward an email message, and the message body (including the text) becomes larger or smaller than the size that you are used to seeing which means that you might have accidentally changed the zoom view setting.

There are a few simple steps for fixing this: 

When the zoom view is changed, the setting is persistent on all future messages you compose, reply to, or forward.

NOTE    The zoom view setting doesn't affect how your recipients will see the message. Messages always open at 100-percent zoom view size.

Change the Size

To adjust the contents when you are composing or reading a message, you have two options  — use your mouse wheel button or the Zoom command on the ribbon.

Use a mouse wheel button to change the zoom

If you have a pointing device, such as the Microsoft IntelliMouse pointing device or any other mouse that has a wheel button, you can use the wheel button to zoom in on, or out of, the body of a message.

  1. Click the message body.
  2. Press and hold CTRL while you rotate the wheel button to zoom in or out.

Use the ribbon controls to change the zoom

The zoom level of the message view can be changed in the ribbon.

  1. Click the message body.
  2. On the Message tab, in the Format group, click Zoom.
  3. In the Zoom dialogue box, under Zoom to, click 100% for the default size, or use the other options to specify a custom zoom size.


Change the size of contents in the Reading Pane

To change the size of contents in the Reading Pane, use the zoom slider control at the bottom of the window.

View zoom control

The zoom resets automatically to 100% when another item is selected. There is no way to permanently set the zoom level.